Garmin VIRB 360 Camera Review
Garmin has recently entered the 360 camera game with their own GPS enabled 5.7k camera with back to back lenses. As a waterproof full 360x180 camera in a very compact package, this intrigued us at 360 Labs. With GoPro Fusion taking a while to become a reality, we jumped at the chance to order the Garmin VIRB 360 and put it through the paces. We’re in dire need of a camera system that is ultra compact and durable to use in the elements.
Packed With Features
There’s no doubt, Garmin crammed about every feature they could into this tiny camera. The most important to us was the ability to submerge the camera in water up to 33 feet without the need for a housing. This is the true definition of rugged, and absolutely vital for some of the more outdoorsy and extreme projects we have on the books for this Summer. Beyond this, features like voice activation, time lapse modes, built in GPS data, 4-channel spatial audio, WiFi, BlueTooth and NFC make it even more appealing.
There are also a host of manual control options including ISO, white balance, bracketing, flat color modes, sharpness, and exposure balance between lenses. It’s important to note that these settings are only available via the mobile app, not by the camera’s menu system.
Resolution in Real Numbers
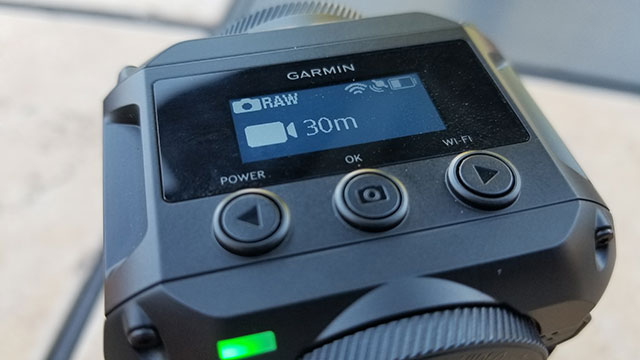
Although the VIRB 360 is advertised as a 5.7k 360 video camera, there are a few important facts to clear up. The 5.7k resolution is only available in what Garmin calls “RAW” lens mode, which provides you with 2 video files in 2880x2880 hemispheres that you need to stitch with Garmin VIRB Edit or third-party software. If you want to take advantage of stitching in the camera automatically, you’ll be limited to 4k resolution.
Furthermore, given overlap needed to stitch, the resulting footage is more like 5.3k. It’s also important to note that 5.7k mode can only be activated through the mobile phone app, not the camera’s menu system. You’ll be warned about decreased battery life, less card space (duh) and potential for overheating when you toggle 5.7k mode. This is worth mentioning, because people are already comparing Garmin’s 5.7k to GoPro Fusion’s 5.2k. They are really only a couple hundred pixels in difference.
As a production studio, we will likely not use the in-camera stitching that much, but this news could be quite a bummer to prosumers and amateurs out there looking to get started with 360 video production and don't want to hassle with stitching.
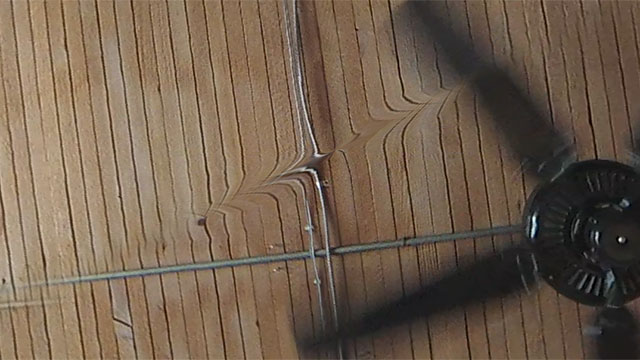
Stitching in camera looks pretty decent along the seam lines on the horizon, although we did notice a pretty nasty artifact in the zenith (top) and nadir (bottom) of the stitch in just about every shot we allowed the camera to process. Garmin uses a 16:9 aspect ratio rather than a 2:1, so perhaps that’s why the zenith and nadir look “pinched in.” For this reason, we will most likely never use the Garmin in any mode but RAW, and always do the stitching ourselves.
UPDATE: as of a firmware update, the stitching along the zenith and nadir has improved quite a bit. We still prefer third party stitching software, because we're crazy perfectionists, but it's much better than before!
Here’s a quick run-down of some actual resolutions:
- 360 video stitched, 3840x2160 at 80mbps, 30fps
- 360 Video RAW (unstitched), 2880x2880 at 60mbps, 30fps, 2 files
- 360 Video RAW (unstitched), 2496x2496 at 50mbps, 30fps, 2 files
- 360 Video RAW slow-motion (unstitched), 1760x1760 at 50mbps, 60fps, 2 files
- 360 Photos, 5640x2816 stitched
- 360 Photos RAW (unstitched), 3008x3000, 2 JPEG files
The bit rates for a single video feed are comparable to a GoPro Hero4 Black (or Hero5) running in ProTune. The slow motion mode is currently the only way to run video at higher framerates, it records 1760x1760 videos at 60fps yielding a stitch at only 3300x1650. It’s a bit of a confusing misnomer, the camera itself doesn’t really slow down the footage, you have to do that in post. Personally, we’d rather keep it at 60fps. Considering the camera can push 5.7k at 30fps, we’d like to see a raw mode that can do 1920x1920 at 60fps and yield a stitch closer to 4k.
A Deeper Dive Into Settings
“Professional Mode” settings are found via the mobile app under the icon that looks like a lens iris, after enabling it you’ll have more manual control over the camera.
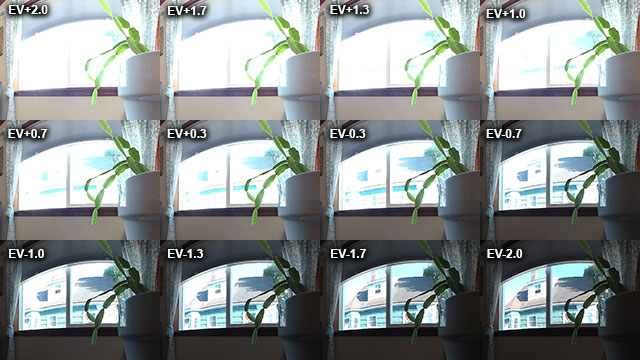
Garmin offers a flat and vivid color mode, although they don't provide any information about the color profile. Exposure bias allows settings to be changed in ⅓ stop increments, from -2 up to +2. We tested it near a window for a fairly challenging dynamic scene. As you can see, some of the highlights are becoming more detailed but we still see lots of blown out exposure. Dynamic range is on par with other action cameras.
Sharpening modes don’t really seem to do very much of anything at all. Footage seems sharp whether you set it to low, medium, or high. Any small amount of sharpening in post really gives away to a lot of ugly artifacts. It’s probably best to leave this setting as is.
White balance is pretty standard, with auto settings or a variety of kelvin levels to choose from. You can also set the exposure balance settings between lenses; choosing from both, front, back, or independent. This can be helpful if you point the camera at a stage and you want to make sure the stage takes priority for exposure over the dark audience, for example.
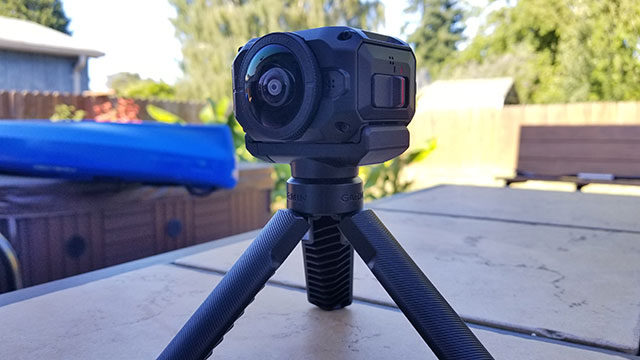
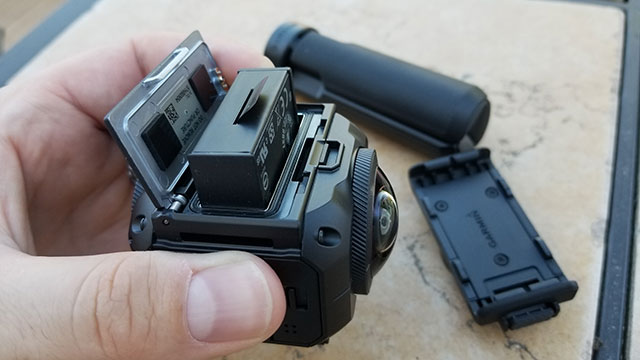
Ergonomics and Feel
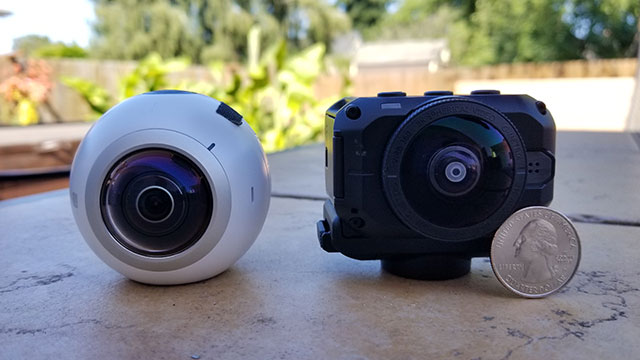
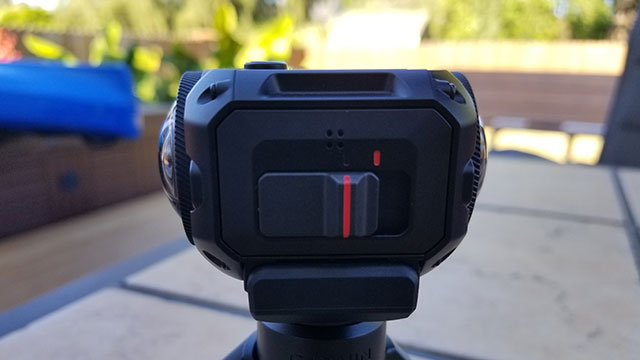
We were excited to find out the camera actually looked a lot smaller than it seemed in photographs. With it’s small size, it could easily be mounted to athletes, cars, surf boards, whatever you want without getting in the way. The camera controls are very simple with 3 buttons on top and a quick record switch on the side. The side switch is helpful for situations where action starts happening immediately and you need to start recording, this one button will power the camera on and start recording.
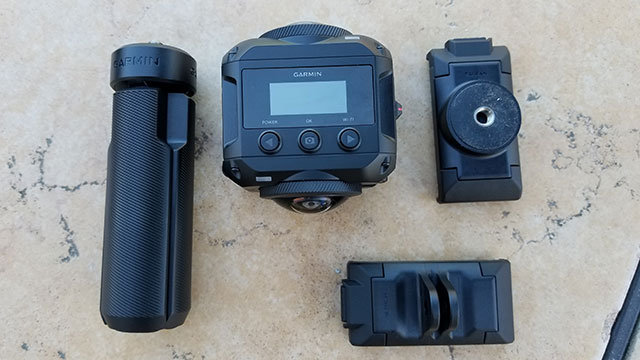
The camera ships with 2 mounting bases that attach similarly to that of a tripod plate, one has a standard ¼-20 screw mount while the other has tabs that will work with GoPro accessories. Along with that comes a tiny set of tripod legs to elevate the camera a few inches off the ground. These are barely functional for real-world uses, but come in handy to prop the camera up on your desktop while you are transferring footage.
The battery is stored under the mounting plate, while the memory card slot, USB, and HDMI ports are on the side opposite the quick record switch. All port doors seem to make a good sturdy seal to keep water out.
Testing Conditions
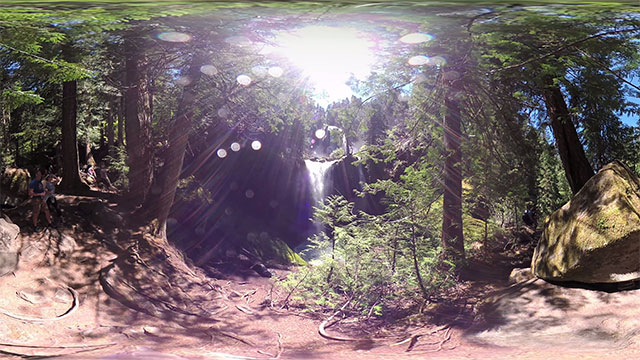
After receiving the camera, we were able to test in several challenging environments including hikes under the forest canopy, car mounted shots, under water, and even mounted to a dune buggy.
The camera has a fairly good dynamic range for it’s price and it’s size, I would put it ahead of the GoPro Hero4, but not by much. One area where it suffers is direct sunlight, large sun streaks will dominate your shot if you point a lens directly at the sun. Chromatic aberration was also visible in tree tops, although it seems to be a bit less than that of a GoPro based rig in similar conditions.
The exposure balancing seems to take a while to calculate differences in moving shots where the sun is visible in 1 lens. It can take a couple seconds for the camera to right itself, meanwhile the line between the 2 hemispheres becomes quite obvious during the transition. Moving from light to dark spaces can also take the camera’s automatic exposure to catch up and figure out what’s going on. We find GoPros and the Samsung Gear 360 (2016 edition) to be a bit more responsive.
Lots of detail showed through in low light, but the image was quite noisy even at ISO 1600. Under these conditions I wouldn’t say it’s any better than a Hero4 Black. Filming during dusk and dawn should be acceptable, and easily fixed with noise reduction in post. I imagine it would be much less forgiving at a concert in a dark venue like a bar or nightclub.
It’s also important to keep in mind that although the Virb 360 is waterproof, it’s not designed for underwater use. Due to refraction underwater, you’ll be missing a lot of information in the middle of your stitch, objects moving by the stitch line such as fish or people will disappear given the fact that the camera does not have corrective lenses for diving. So while it’s a good camera that can survive a dunk, it’s not a camera you can use underwater exclusively and get good stitching results.
Below you'll see a collection of our test shots that were stitched in camera. No additional GPS stabilization was applied, for the most part these are right off the camera. As you can see, we put the VIRB in some challenging positions for dynamic range. Some of the issues I mentioned about exposure balancing are noticeable, as is the nadir and zenith stitching issue. Take a look and judge for yourself.
The battery life is advertised at 1 hour, in the field we found that to be fairly accurate. One thing to keep in mind is that the battery indicator can easily fool you into thinking you have a lot more battery life left than you think.
Post Production
The Garmin VIRB 360 bundles in Garmin’s own free software, VIRB edit, that will allow you to make cuts, apply stabilization and stitch your 5.7k or 5k raw footage. VIRB edit uses the GPS data recorded on the camera to perform horizon stabilization and give you a variety of overlay stat displays for speed, elevation and your walking path. You can also see your trek on a map.
VIRB edits export options are somewhat limited, we found that a 360 video export at the highest maximum quality setting was 40mbps at 3840x2160. The proper meta data for 360 spherical video and spatial audio is added to each export file, so both YouTube and Facebook should recognize your content as 360.
Below you'll see a collection of shots we did in Garmin's 5.7k RAW mode, stitched in Mistika VR with minimal post. I didn't spend much time on stitching, did no compositing, no stabilization, and pretty much left color and sharpening as is out of the camera. The file was mastered in 4096x2048 H.264 at 100mbps, then uploaded to YouTube.
There’s a variety of other consumer facing features such as adding musical tracks, text titles, fade and wipe transitions and more. They’ve got about a dozen generic musical tracks pre-loaded, or you can load your own if desired. The text titles will properly warp to display correctly in 360, as if you had placed them with a plugin like Mettle Skybox. There doesn’t appear to be an option to add graphics.
Audio
Audio settings allow you to toggle for spatial, rear only, and off. The rear only mode is recommended for moving shots where you may want to cut out wind noise. The camera records spatial audio in AmbiX format, for distribution in 1st order ambisonic. The resulting file is very similar to that of a spatial recording from a Zoom H2N, albeit lower quality.
We gave some clips to our sound designer to have a quick listen. He reported that the microphone was relatively noisey, as to be expected from internal on camera mics. On board mics often record a lot of noise from the camera itself, which makes them hard to use for clean audio in a professional project. The VIRB 360 is no exception to that.
The spatialization is really not all that great, it’s difficult to get that much of a sense of presence from 1st order ambisonics. Any consumer level 360 camera with an on-board spatial mic is really not much more than a gimmick at this point, not ready to be considered a professional tool. We rarely use onboard mics for anything other than reference, and this one is fine for that.
Advanced Stitching
So we’ve mentioned we don't always like the in-camera stitching. Luckily Garmin gives us the RAW mode and allows us to stitch our own footage. Lately we’ve been doing a lot of our stitch work in Mistika VR and found that it does an incredible job on the footage from the Samsung Gear 360. Knowing this, we worked closely with the Mistika team to create an accurate preset for the Garmin VIRB and the results are astounding! If you are unhappy with the stitch in camera and you want to take the plunge on learning to stitch, we would certainly recommend looking at Mistika. A license for Mistika VR will run you about $50/month, with an annual option for cost savings.
We were also able to get decent stitches in AutoPano Video Pro, using presets for wide lenses such as Entaniya 220 or iZugar. AVP sells for just under $700 for a license in perpetuity. You might consider waiting for the full release of the 3.0 version, it’s currently in beta and offers an amazing feature they call D.warp that can alleviate stitching lines. It’s similar to optical flow (they say better) as offered in Mistika. But I won’t get into too much detail on how stitching software works, I could write an entire blog about that. Just know there are options.
If you do decide to stitch on your own, when using spatial audio make sure to pay attention to where the front lens is pointed during recording. Your spatial audio will be linked to the orientation of your camera, so if you point your shot in a different direction in your stitching software by panning it, your audio will be misaligned. Of course, advanced users can also pan the audio in post.
Concluding Thoughts…
The biggest glaring issue with the VIRB is the nadir/zenith pinching, which was fortunately addressed with a firmware update. But as crazy perfectionists, we still prefer to stitch on our own. We aren’t optimists when it comes to automatic stitching. Since we’ve been at this for years, we have learned to set our expectations low and our post production estimates high. But Garmin still beat GoPro to market with an integrated 2 lens 360 camera with more than 4k resolution. They have packed an insane amount of features into a tiny package, and deliver an image quality I would say is superior to any of the other consumer grade 2 lens 360 cameras released to date - if you are willing to work on it in post.
It’s really a game changer for a team like ours specializing in extreme outdoor content. To get decent resolution in a compact package in the past, we would hack apart GoPros and install aftermarket wide fisheye lenses. But those were never waterproof, the housings could never support the wider lenses. They also lacked sync. Garmin has made a useful capture tool for mono 360 video in some of the most adverse conditions. As a result, they may have rendered our back to back and triple GoPro systems obsolete.
Pros
- Waterproof without needing a housing
- Stitch in cam or stitch yourself
- Good dynamic range for price
- Very small and light weight
- Easy controls
Cons
- Stitching in cam could be better
- Sun glare is bad in direct sunlight
- 60 fps modes only go up to 3.5k stitched
- VIRB Edit software can be buggy and unreliable for some users
- Slow to adjust exposure between lenses