How We Built ROVR, Our Remote Operated VR Camera Platform
We get a lot of requests from clients for walking tours moving through houses, facilities, offices or buildings. The biggest challenge to do this in 360 video is to hide from your own camera. If you hold the camera, not only are you in your own shot but you are also undoubtedly making things unstable with your own motion. To alleviate this we’ve also seen people use Segways, power chairs and hoverboards too but these don’t eliminate the camera operator from the shot. That usually means you’ve got to slap a huge logo in the nadir to cover that footprint.
There’s got to be a better way! So we looked at creating a remote control motorized platform for driving our camera around. When we started our research, we found that existing platforms were quite expensive starting anywhere from $5,000 up to $10,000 for a simple RC chassis with some modifications. Many of these platforms like the Freefly TERO were designed to move at speeds of up to 30 mph, with 1 camera mounted low to the ground on a gimbal for a low center of gravity.
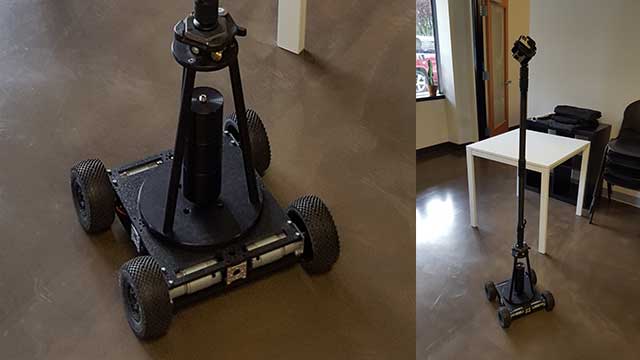
Our hope was to build a low and slow crawler for traveling at less than average walking speed and mount our 360 camera at standard human height. Many of the products currently on the market just wouldn’t work. The only platform specifically built for VR video production was upwards of $18,000 USD, and only available in the UK from Motion Impossible. It wouldn’t have been feasible to get in time for our upcoming project, and likely not inside our client’s budget. However, we’ve looked at Motion Impossibe’s Mantis and were very impressed. If you have the budget and you need a solution that's rock solid out of the box, check these guys out.
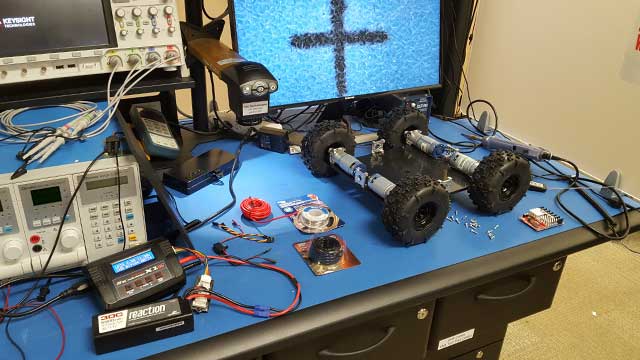
We decided to build our own. The problem was that most RC cars and trucks are built for speed, and their parts are intentionally made to weigh less. We basically wanted a slow and heavy square that we could drive around. Luckily, we discovered the “build your own” robot market. Retailer ServoCity had a great selection of robot bases and pre-packaged kits that looked to be exactly what we needed. A simple base with 4 wheels, low center of gravity, and heavy.
Since we knew nothing about this world, we sent an email to ServoCity’s tech department with questions. We explained our intended use for the platform, offering details about our camera rig and our needs. These guys are awesome! They gave us a complete suggested parts list, and hooked us up with a prototype kit they had been developing based on a small platform they call the Scout. The newer prototype (The Prowler) was slightly larger, at 10.5 inches x 9 inches (and bigger with tires). Beyond this, they recommended swapping in 118 rpm motors so that our speed would top off at only 2 mph, perfect for slow dolly style motion. The Freefly TERO previously mentioned had a minimum speed of 2 mph.
ServoCity kits are designed for a DIY audience, so your platform will not come fully assembled. You’ll need to put together the pieces, and wire your motors to your control board. Luckily, ServoCity has great step by step tutorial videos on YouTube. There was also a setting we had to change on the board itself, but the manufacturers website had a full spec sheet with details on how to get the board into RC mode. ServoCity also recommended a 12v power source, but we’ve had great performance and battery life from a 5000mah 11.1 lipo battery pack. I should also mention I’m not the most mechanically inclined person, but it helps to have a friend who’s a hardware design engineer at Intel with his own lab. Thanks Nic!
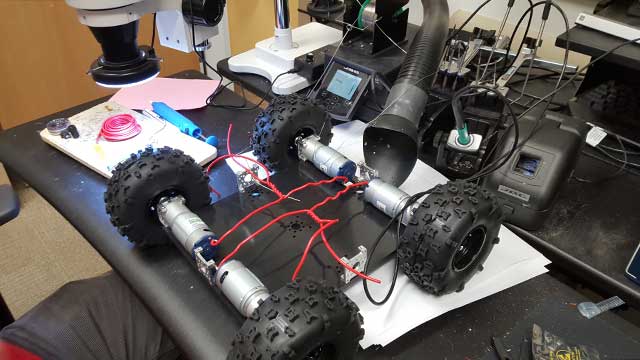
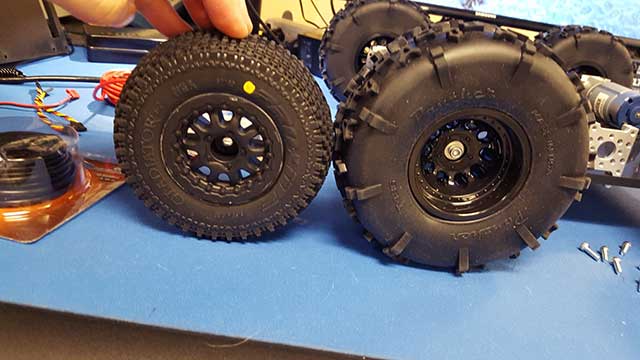
We made a few minor changes to suit our needs, the first being the tires. The platform is made to be operated outdoors in varying terrain, we found the off-road tires made for a rough ride indoors. We bought smoother tires from a local hobby shop, but kept the off-road tires around for future projects. Our camera mast is comprised of a riser platform that we salvaged from the Immersive Media Street View days, along with a Nodal Ninja Pole. We also weighed it down with stackable weights from Freedom360, although we might switch out for a 5lb disk weight instead to keep the center of gravity low. A single forward facing GoPro was added for monitoring the direction of travel remotely.
The remote suggested for us was a transmitter from Tactic. It has lots of configuration options but we did have a minor problem with it. The left joystick’s up/down axis is designed as a throttle, so it stays in place when you let go. The right joystick does not do this. With tank style controls, each joystick controls each side of the platform. So you can imagine what happens when you let up on the controls but the left throttle says on, your rig starts doing cookies! In hindsight, we may have opted for something different. For now, we just programmed the forward/backward motion to the left/right axis for each joystick, both of them snap back to “0” when let go.
Although this rig was much cheaper than buying an already modified RC chassis, it does have drawbacks. The tank style controls mean that each wheel operates on an independent motor. To turn, you simply give more power to one side over the other. This can make it challenging to get all 4 wheels moving at the same exact speed, it takes practice to keep it consistent. At full speed, we’ve also noticed the motors may not all move at exactly the same rate, meaning the rig could tend to start slowly listing left or right. Something with a drive train would likely move the wheels at exactly the same pace. But for the price and for our purposes, we’re pretty happy with the results nonetheless. See test footage here:
This was stitched and stabilized via AutoPano Video. If you look down, you can see the ROVR's footprint under our transparent watermark. If you are not seeing the example in 360, hit the YouTube link directly and open in the YouTube app.
It’s definitely a work in progress. For the 2.0 version, we’re looking to come up with a better solution for monitoring the direction through the front facing GoPro. Relying on GoPro’s WiFi alone is just not good enough. We’re also thinking about adding a vibration dampening platform between the mast and the wheel base. We haven’t noticed much of a vibration in the footage captured so far, but every little bit helps.
We’ve got the complete parts list below if you’d be interested in starting your own project. Overall with shipping and bits and pieces we’re about $700 into the platform, but we could have easily saved a bit more. It might be possible to get a kit with the tires you want instead of having to buy an extra set, for starters. We didn’t include the Nodal Ninja pole or other rigging accessories we added to the platform, really just about any pole or monopod will work.
| Prowler Robot Kit (motors, plates, hardware, tires) | $219.99 |
| RoboClaw 2x30A Motor Controller | $124.95 |
| TTX410 Tactic 2.4GHz 4-channel Radio System | $79.99 |
| Reaction 11.1v 5000mAh Battery | $69.99 |
| Gladiator SC 2.2 / 3” Medium Tires x 4 | $75.98 |
| X1+ AC Single Port AC/DC Charger | $69.99 |
| Total | $640.89 |
In closure, I’d highly recommend ServoCity to buy parts for your projects. If you look through some of their videos you will also find people building motorized camera dolly tracks and more. The possibilities are endless. It’s amazing what you can do if you are willing to tinker. We hope you found this post useful, and if you have a project of your own in the works, by all means share it!